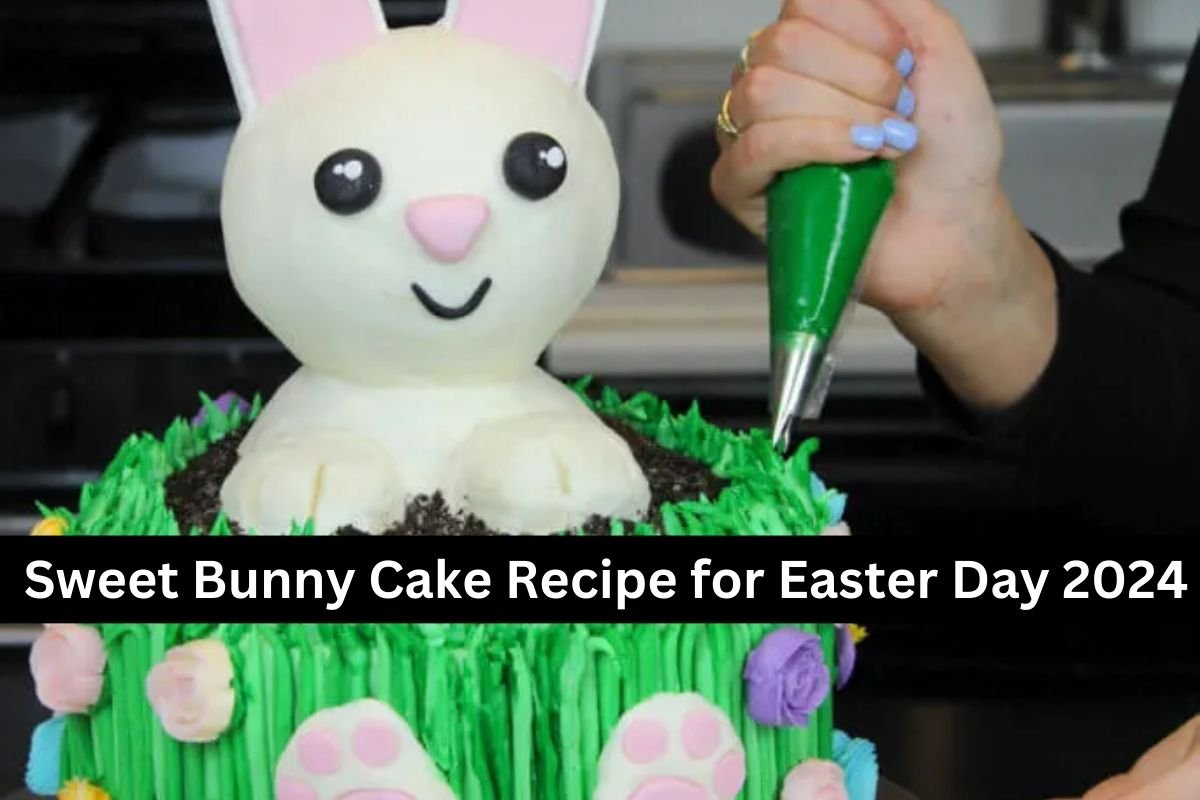
Sweet Bunny Cake Recipe for Easter Day 2024 :-I have previously prepared a fairly simple Easter bunny cake, but this year I decided to take things to the next level and make it more elaborate.Almost like a sculpted cake, this cake is a great dessert. VERY NEARLY! Without a doubt, it demands a greater amount of labor than my previous Easter cakes. I’m not going to like it because it took some time to smooth out the little bunny’s head.
Advertisement
Advertisement
Sweet Bunny Cake Recipe for Easter Day 2024
Advertisement
Ingredients :
Vanilla Cake
- 3 cups all-purpose flour (390 grams)
- 3 cups granulated sugar (600 grams)
- 2 1/2 tsp baking powder (10 grams)
- 1 tsp salt (6 grams)
- 1 cup unsalted butter, room temperature (226 grams) – 2 sticks
- 2 tsp. vanilla extract (8 grams)
- 1 cup egg whites (or about 7 egg whites) (280 grams)
- 1 1/2 cups buttermilk, room temperature (360 grams)
- 1/8 cup vegetable oil (28 grams)
- green gel food coloring
Vanilla Buttercream Frosting
- 3 cups unsalted butter, room temperature (678 grams)
- 11 cups powdered sugar (1375 grams)
- 1 tsp salt (6 grams)
- 1/3 cup heavy cream (or whipping cream) (75 grams)
- 1 1/2 Tbsp vanilla extract (18 grams)
- green gel food coloring
- purple, blue, pink, yellow, and orange gel food coloring (optional)
Advertisement
Instructions :
1 . To Be Made In Advance:
- Ensure that the ears of the rabbit are firm before adding them to the cake. This is an essential step. To ensure that they are, you may either prepare them the day before, or you can use gumpaste (or add tylose powder to the fondant) to help them dry more rapidly. Both of these options are recommended. It is because of this that they will be solid and will not break when they are added to the cake.
- To make the ears, roll out white fondant or gumpaste to a thickness of about a quarter of an inch, and then cut out two ears that are approximately seven inches in length.
Advertisement
- Two wooden skewers should be pressed onto the top of the white fondant ears in such a way that approximately one and a half inches of the skewer should extend from the bottom the ears.
- Using the pink fondant, roll it out and cut out two ears that are little smaller than the others.
- A very small amount of vodka or lemon extract should be used to brush the center of the white ears, and then the pink fondant should be placed on top of them. After using a round instrument (I used a little rolling pin), curl the top of one of the ears, and then set it aside to dry.
- While you have your fondant out, use pink and black fondant to mold the eyes, nose, mouth, and food pads of the bunny. Allow to dry in the air.
Advertisement
2 . Vanilla Cake Layers:
- Bake at 350 degrees Fahrenheit. Line three cake pans measuring four inches in diameter and three round pans measuring eight inches with parchment paper. Using non-stick cooking spray, grease the surface.
- After thoroughly combining all of the dry ingredients (flour, baking powder, sugar, and salt), use a stand mixer equipped with a paddle to mix the ingredients together.
- Using a low speed, gradually incorporate chunks of butter that has been at room temperature into the dry mixture. The mixture should be continued to be mixed until there are no large bits of butter left and it turns crumbly-like.
Advertisement
- The egg whites should be poured in and mixed on low until they are just integrated. A low speed should be used to incorporate the buttermilk in two separate batches.
- Mix the vanilla extract and oil together at a low speed until they are completely combined. First, use a spatula to scrape down the sides of the basin, and then beat the mixture on medium speed for around thirty seconds.
- The cake pans measuring four inches in diameter should be filled with batter to a height of approximately one inch. Put aside for later.
Each of the three bowls should receive an equal amount of the remaining batter. - Applying an increasing amount of green gel food coloring to each bowl, dye each bowl a different shade of green. Continue to mix until the batter has a uniform hue.
Advertisement
- By alternating spoonfuls of the various green colored cake batters, pour the batter into the eight-inch cake pans that have been prepared. After all of the batter has been placed in the pans, create a marbled pattern by dragging a tiny offset spatula or butter knife through the batter in both horizontal and vertical lines.
- Both the four-inch and eight-inch cake layers should be placed in the oven that has been preheated.
- After twenty-seven to thirty minutes, or until a toothpick pulls out clean, remove the cake layers that are four inches in thickness from the oven.
For a total of 34 to 37 minutes, or until a toothpick inserted into the center of the 8-inch cake layers comes out clean.
Advertisement
- After allowing the pans to cool for ten minutes, remove the cake from the pan by using an offset spatula to run around the perimeter of the pan.
- Alternately, you can speed up the cooling process by placing the cake layers in the freezer for forty-five minutes. When all of the layers have reached the desired temperature, carefully flip them over and remove them from the pans.
- To ensure that the tops of the eight-inch cake layers are even, use a knife with a serrated edge. Do not remove the dome from the cake layers that are four inches thick.
Advertisement
3 . Vanilla Buttercream Frosting:
- In the meantime, prepare the vanilla buttercream frosting while the cake layers are baking and cooling.
- The butter should be beaten with a paddle attachment for thirty seconds at a medium speed until it is completely smooth. Add the powdered sugar in a slow and steady manner, one cup at a time. Alternately, add a few drops of cream here and there.
- After everything has been thoroughly combined, add the vanilla extract and salt, and continue to beat on low speed until all of the ingredients are completely blended and the ideal consistency is achieved.
Advertisement
- If the frosting is too thick, add more cream, one teaspoon at a time, until it reached the desired consistency. The frosting should be thickened by adding additional powdered sugar, a quarter of a cup at a time, if it is too thin.
- Gel food coloring should be used to color one cup of frosting a dark shade of green, and another cup of frosting should be colored a lighter shade of green before being used. Put the mixture into piping bags and cut an aperture that is approximately half an inch wide. Put aside for later Maintain the white color of the remaining buttercream.
Advertisement
4 . To Assemble The Cake:
- Place cake layers on a grease-proof cake board and frost them. Use a small amount of frosting to help the first cake layer stick to the board.
- Take one of the cake layers that measures eight inches and place it on the cake board. Cover each cake layer with an even layer of frosting. Keep going until all three 8-inch cake layers are stacked on top of each other.
- Put a thin layer of frosting all the way around the cake to cover all of the layers. Use a bench scraper to make the frosting smooth. Then, put the cake in the fridge for 20 minutes or the freezer for 5 minutes until the frosting feels hard.
- Get a bubble tea straw or a wooden dowel and put it in the cake. Then, stack the four-inch cake rounds on top of the straw or dowel. Place one cake layer on top of the others so that the dome side is facing up.
- Cover with frosting, then add a cake layer that is upside down (dome down). If you want to make a dome shape, put the last 4 inch cake piece on top, dome side up.
- Put a thick layer of buttercream on top of the four-inch cake pieces and smooth them out with an acetate sheet.
- Put Oreos around the bunny’s base to make it look like dirt. Put rings of buttercream in front of the bunny rabbit’s body to make paws. Freeze the cake for about 20 minutes to make sure the bunny stays put.
- Use the green frosting to pipe lines up the sides of the cake to make it look like grass. Pipe green frosting into any empty space on top of the cake between the oreo dirt and the edge of the cake.
- You can decorate the cake with chilled frosting flowers if you want to.
- Carefully press the ears into the top of the bunny’s head, and use small dots of frosting to make the bunny’s face.
- Put two circular shapes of white buttercream on the front of the cake and smooth them out with a small offset spatula. This will be the face of the rabbit. Use frosting to press the foot pads into the cake.
Advertisement